You take a look in the mirror, check out your new hardware, and feel a surge of excitement about your future perfect smile.
Then, about four hours pass, and reality sets in.
The initial excitement fades into a dull ache, your cheeks feel like they are losing a battle against raw metal, and trying to pronounce the word "success" suddenly makes you sound like a leaky tire. Don't panic. What you are feeling is entirely normal. The first seven days are undeniably the hardest part of the entire orthodontist journey. Your mouth is a highly sensitive environment, and introducing brackets and wires requires a massive structural and biological adjustment.
To help you navigate this transition smoothly, we have put together the ultimate step-by-step first-week survival guide to manage pain, master orthodontic wax, adjust your speech, and eat well.
1. Managing the Initial Soreness
When braces are first placed at the dental clinic, they immediately begin applying continuous, light pressure to your teeth to loosen the periodontal ligament—the tissue that anchors your teeth to your jawbone. This biological shifting triggers localized inflammation, which peaks between 24 to 72 hours after your appointment.
To get through the peak soreness days after leaving the dental clinic, establish a pain-management routine early:
Preemptive OTC Relief: If approved by your doctor, take an over-the-counter pain reliever like acetaminophen or ibuprofen before the numbness or initial comfort wears off. Staying ahead of the pain threshold is much easier than trying to pull yourself out of a severe ache.
The Warm Saltwater Rinse: Dissolve one teaspoon of salt in a glass of warm water and swish it around your mouth for 30 seconds, 4 to 5 times a day. Saltwater changes the pH balance of your mouth, reduces swelling, and acts as a natural disinfectant for tiny cuts on your inner cheeks.
Cold Therapy: Drink ice water or gently suck on smooth ice chips. The cold temperature acts as a localized ice pack, constricting blood vessels to dull the throbbing sensation and reduce inflammation.
2. Mastering Orthodontic Wax
Your inner cheeks and lips are lined with delicate mucosal tissue. When smooth metal brackets are introduced, they create friction points that can lead to painful canker sores. Your absolute best friend this week is orthodontic wax. It acts as a smooth barrier, allowing irritated tissues a chance to heal.
Many beginners struggle to make wax stick because they apply it incorrectly. To ensure it stays in place, follow this specific process:
Dry the Area Completely: Orthodontic wax will not stick to a wet bracket. Use a clean cotton swab or a tissue to thoroughly dry the specific bracket or wire poking you.
Pinch and Warm: Pinch off a small, pea-sized piece of wax from your pack. Roll it between your fingers for a few seconds. The warmth of your skin softens the wax, making it pliable.
Press and Mold: Press the ball of wax directly onto the dry bracket, molding it flat around the edges so it hooks onto the metal securely.
Remove Before Eating: Always remove your wax before meals so you don't accidentally swallow it (though if you do, don't panic—it is non-toxic and entirely medical-grade).
3. Adjusting to the "Speech Shift"
If you feel like you are lisping or spitting when you talk during your first few days, you aren't imagining things. Your tongue relies heavily on the back of your front teeth and the roof of your mouth to articulate specific consonants, namely S, T, CH, and V.
When brackets occupy that space, your tongue's spatial awareness is thrown off, resulting in temporary speech alterations.
Fortunately, your brain's motor cortex adapts remarkably fast. You can speed up the process by speaking out loud as much as possible when you are alone. Pick up a book or scroll through an article and read it aloud, deliberately over-enunciating the words that trip you up. Sing along to your favorite music in the car. The more repetitions your tongue gets around the new hardware, the quicker your normal speech patterns will return usually within 3 to 5 days.
4. Navigating the First-Week Diet
You already know to stay away from sticky caramel and hard nuts, but during week one, even biting into a soft piece of bread can feel agonizing. The trick is focusing on high-calorie, nutrient-dense soft foods that require absolutely zero chewing power.
|
Meal Category
|
Best Options
|
Why It Works
|
|
Proteins
|
Scrambled eggs, flakey baked fish, silken tofu
|
Soft textures that provide structural repair proteins without pressure.
|
|
Carbohydrates
|
Mashed potatoes, overcooked pasta, oatmeal, polenta
|
Dense, comforting starches that fill you up safely.
|
|
Vitamins / Greens
|
Fruit smoothies (no seeds), blended vegetable soups
|
Easy delivery of micro-nutrients without risky leaf fibers getting stuck.
|
Instead of just surviving on plain yogurt and applesauce, build a diverse, filling meal plan to keep your energy up:
The 7-Day Timeline: What to Expect
Day 1: The Honeymoon & First Ache
Timeframe: Hours 1 – 24
What to expect: The braces feel bulky but don't hurt immediately out of the chair. By evening, a dull, generalized throbbing begins as the teeth start to register the pressure.
Days 2 – 3: The Peak Resistance
Timeframe: Hours 25 – 72
What to expect: This is the peak of soreness. Chewing solid food feels impossible, and your cheeks may feel raw. Rely heavily on cold liquids, soft foods, and consistent orthodontic wax application.
Days 4 – 5: Turning the Corner
Timeframe: Hours 73 – 120
What to expect: The constant ache begins to recede into a manageable pressure. Your tongue starts to figure out how to navigate around the brackets, and your speech begins clearing up.
Day 7: The New Normal
Timeframe: Hour 168
What to expect: Your cheek tissue has begun to toughen up (callousing), the soreness is mostly gone except when biting down directly, and you are officially over the hardest hill.
Your First-Week Checklist
Before you close this guide, double-check that you have these four essentials ready on your nightstand or in your bag:
Orthodontic Wax (Keep a pack in your pocket and one in your car)
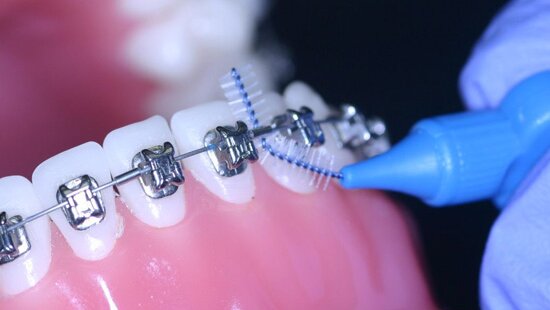
A Water Flosser or Interdental Brushes (Food traps are much worse now)
Salt (For your warm water morning and nightly rinses)
Approved Pain Relief (To manage the Day 2 and Day 3 peaks)